| BGF main typology | BGF subtypology (Norm: PBE 2023) | BGF subtypology (Norm: PBE 2020) |
|---|---|---|
| Green terrain | B1.1 - Green terrain: existing field and shrub layer < 2m | A1, T2 - Green terrain: existing vegetation |
| Green terrain | B1.2 - Green terrain: new field and shrub layer < 2m | A1 - Green terrain |
| Green terrain | B1.3 - Green terrain: existing ground layer | A1, T2 - Green terrain: existing vegetation |
| Green terrain | B1.4 - Green terrain: new ground layer | A1 - Green terrain |
| Green roofs | B2.1 - Green roof: growing medium ≥ 80 cm | A2.4 - Green roof: growing medium ≥ 60 cm |
| Green roofs | B2.2 - Green roof: growing medium 40-80 cm | A2.3 - Green roof: growing medium 20-60 cm |
| Green roofs | B2.3 - Green roof: growing medium 10-39 cm | A2.2 - Green roof: growing medium 3-20 cm |
| Green roofs | B2.4 - Green roof: growing medium 3-9 cm | A2.1 - Green roof: growing medium 0-3 cm |
| Green walls | B3.1 - Green wall: plant wall and vertical agriculture | T3 - Green wall |
| Green walls | B3.2 - Green wall: climbing plants | T3 - Green wall |
| Rain gardens, water features and wetlands | B4 - Rain garden, water bodies, and wetland | A3 - Water surface |
| Terrain subsidence and wadi | B5 - Terrain depression | T1.1 - Terrain depression: infiltration |
| Terrain subsidence and wadi | B5 - Terrain depression | T1.2 - Terrain depression: retention |
| Partly permeable surface | B6.1 - Partially open surface: permeable green | A4 - Permeable surface |
| Partly permeable surface | B6.2 - Partially open surface: semi-permeable gray | A4 - Permeable surface |
| Partly permeable surface | B6.3 - Partially open surface: partially permeable gray | A4 - Permeable surface |
| Impermeable surface | B7 - Impermeable surface | A5 - Impermeable surface |
| Existing trees | C1.1 - Existing trees (XL): trunk circumference > 200 cm | T5.3 - Existing trees (L): trunk circumference > 90 cm |
| Existing trees | C1.2 - Existing trees (L): trunk circumference 90-200 cm | T5.3 - Existing trees (L): trunk circumference > 90 cm |
| Existing trees | C1.3 - Existing trees (S): trunk circumference < 90 cm | T5.2 - Existing trees (L): trunk circumference < 90 cm |
| New trees | C2.1 - New trees (L): future height > 10 m | T4.1 - New trees (L): future height > 10 m |
| New trees | C2.1 - New trees (S): future height < 10 m | T4.1 - New trees (S): future height < 10 m |
Bluegreen Factor (BGF)
The Bluegreen Factor (BGF) is a norm promoting blue-green development in municipal building zones by assesses the quality of blue-green structures, which includes water bodies like lakes and rivers (blue) and natural areas such as parks and gardens (green). The BGF norm weights blue-green structures and measures. The sum of these weighted values, divided by the area of the plot, gives the BGF value for the project. Traditionally, this process was done by manually recording the area of each blue-green structure and the count of each measure in a spreadsheet. The BGF-QGIS app automates this task by allowing the user to map and digitize blue-green structure typologies and measures. The app calculates the area of each blue-green structure and counts the number of measures. The user can then choose a BGF norm or define a custom norm. The total BGF value for the project area is calculated and displayed in the app.
Cost calculation of Blue-Green Infrastructure
The BGF-QGIS app integrated a cost module which calculates the investment and maintenance cost per blue-green structure and measures as well as for the total project area.
Bart add more text here
BGF Norms and calculation methods
The app supports the following norms:
- BGF PBE 2023: Norm for vegetasjon og vannhåndtering (blågrønn faktor)
- BGF Standard Norge 2020: NS 3845:2020
- Custom user-defined norm: the user manually defines the weights for the different blue-green structures and measures inside the app.
Differences between BGF PBE 2023 and SN 2020
-
Green terrain:
- PBE 2023: Distinguishes between both new and existing vegetation and surface layer.
- SN 2020: Does not distuinguish between vegetation and surface layer. Existing vegetation is factored in as a additional weight.
-
Green Roofs:
- PBE 2023: Classifies green roofs by growing medium with specific growing ranges per class.
- SN 2020: Uses slightly different growing ranges and weights per class for green roofs.
-
Green Walls:
- PBE 2023: Distinguishes between vertical urban agriculture and climbing plants.
- SN 2020: Does not distinguish between vertical urban agriculture and climbing plants, and uses slightly different weights.
-
Surface Water:
- No differences in the classification, but PBE 2023 weights surface water higher than SN 2020.
-
Surface depsression:
- PBE 2023: Classifies surface depression but does not classify additional measures.
- SN 2020: Classifies surface depression and factores in the mainfunction: infiltration or reduction/delay of runoff.
-
Permeable and Impermeable surfaces:
- PBE 2023: Classifies permeable and impermeable surfaces and subclassifies permeable surfaces into: permeable green, semi-permeable gray and partially permeable gray surfaces.
- SN 2020: Classifies permeable and impermeable surfaces, but does not subclassify permeable surfaces.
A crosswalk between the two norms is provided in the BGF-QGIS app, and can be downloaded here.
BGF-QGIS User Guide
Getting Started
- Install QGIS
-
Install and activate the plugins:
Plugins -> Manage and Install Plugins- Geometry Checker (core plugin)
- Offline editing (core plugin)
- Processing (core plugin)
- Topology Checker (core plugin)
- (OPTIONAL) QField Sync
- (OPTIONAL) NIB-ortofoto-prosjekt
- Activate necessary toolbars:
View -> Toolbars- Project Toolbar
- Map Navigation toolbar
- Attributes Toolbar
- Plugins toolbar
- Selection Toolbar
- Digitizing Toolbar
- Snapping Toolbar
- (OPTIONAL) Advanced digitizing toolbar
- (OPTIONAL) Shape digitizing toolbar
- Activate necessary panels:
View -> Panels- Browser Panel
- Layer Panel
- Download or clone the BGF-QGIS app from GitHub: BGF-QGIS_3.x
You are all set up and can now open the BGF-QGIS project in QGIS!
Configure the Project
Configure the project settings: Project -> Properties
- Set the project title:
-> General - Set the project units:
-> General- Default: meters
- Set the title, author and abstract:
-> Metadata: - Set the project CRS to the desired coordinate reference system:
-> CRS- Default: EPSG:25832 (ETRS89 / UTM zone 32N)
Background Maps
The BGF-QGIS app provides online background maps for the whole of Norway under the group “Online Grunnkart” in the QGIS Layer Panel. The user can also add additional WMS layers by selecting Layer -> Add Layer -> Add WMS/WMTS Layer.
It is recommended to download offline maps for the project area to ensure that the app works offline, and to make it easier to digitize blue-green structures by snapping to the background map.
Download offline maps:
Layer -> Add Layer -> Add Raster Layer/Add Vector Layer- It is recommended to download the following layers:
- FKB bygning - bygning_omrade: GeoNorge - FKB bygning
- Matrikkelen Eiendomskart teig: GeoNorge - Matrikkelen
- Tree crown polygons for your municipality if available.
Note that for offline use of the BGF-QGIS app. You must remove the online background maps (WMS-layers) from the QGIS project, otherwise your QGIS project is not able to work offline. Do this BEFORE going offline or into flightmode.
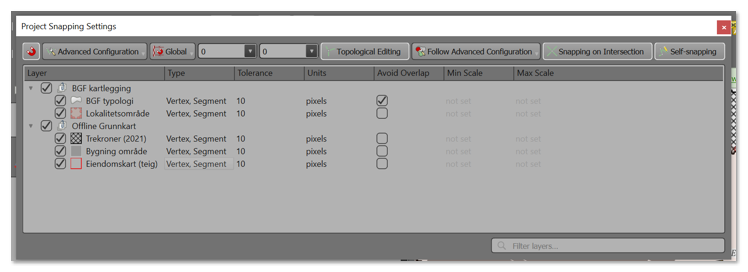
Snapping Options
Configure snapping options: Settings -> Snapping Options
- Enable snapping options for the project.
- Recommended snapping tolerance is 10 pixels.
- Set the snapping mode to
VertexandSegment. This allows you to snap to the other BGF typology polygons, the offline background map layers and the project area boundary. - Enable the
Avoid intersectionoption for the layerBGF Typologi. This prevents the creation of overlapping polygons and automatically cuts the new polygon along the boundary of the existing polygon.
You can activate and deactivate snapping and tracing of objects by clicking on their icons or pressing the shortcut keys.
- Snapping icon:
manget(Shortcut:s) - Tracing icon:
line and lightning bolt(Shortcut:t)
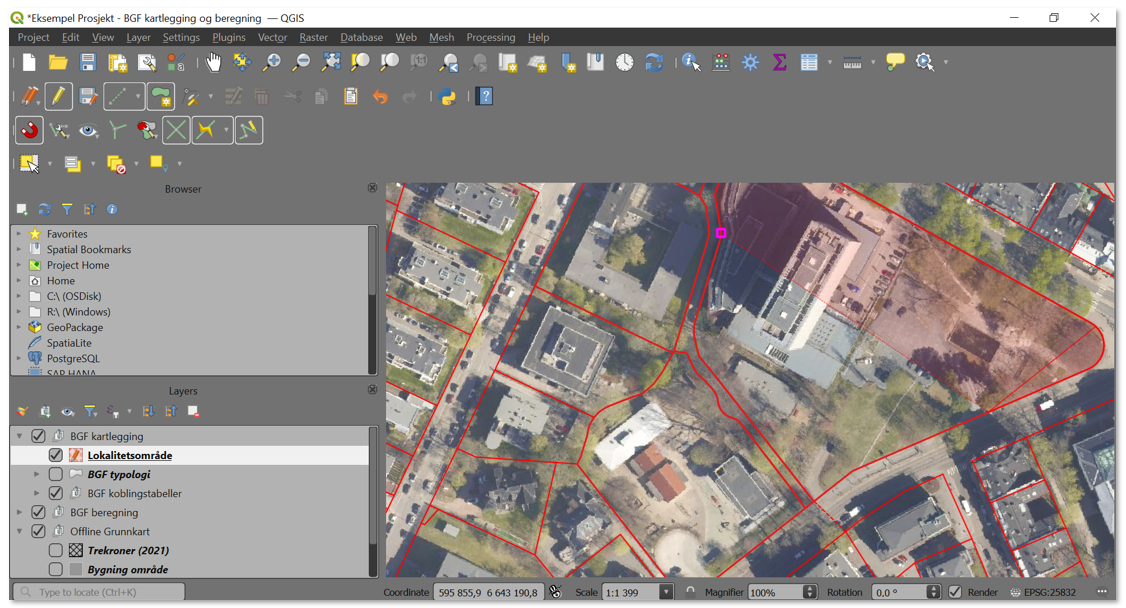
Map the Project Area
Map the project area, which is often a cadastral parcel or a building plot. It helps to add and enable a background map with the cadastral parcel boundaries (see Background Maps).
- Select the
Lokalitetsområdelayer in the QGIS Layer Panel. - Activate editing mode by clicking on the
Pencilicon. - Activate
Enable tracing (t)to easily follow the cadastral parcel boundary. - Click on the
Add Polygon Featureicon and digitize the project area by tracing the cadastral parcel boundary. Finish by right-clicking or double-clicking. - Review the auto-filled fields in the pop-up window and click
OK. To reopen the pop-up window, use theIdentify Featuresbutton and click on the project area polygon. Then click on theOpen formbutton.
Advanced digitizing options (e.g. splitting/merging of polygons) are explained in the QGIS User Guide.
It is recommended to digitize only one project area per QGIS project. If you have multiple project areas, you can create a new QGIS project for each project area using the template provided in the BGF-QGIS app.
Note that is important to save your edits regularly by clicking on the Save Layer Edits icon or using Ctrl + S. You can also save the project by clicking on Project -> Save or using Ctrl + S.
Map Blue-Green Structures
Map the blue-green structures within the project area. The BGF-QGIS app provides a predefined typology layer, BGF typologier, with the typologies listed in the table below. For a full cross-walk table showing both English and Norwegian typology names see BGF_typology_lookup.
Digitizing the blue-green structures
- Select the
BGF typologilayer in the QGIS Layer Panel. - Activate editing mode by clicking on the
Pencilicon. - Ensure that the in the Snapping options
Avoid overlayis enabled for the BGF typology layer, so polygons are automatically cut along eachothers border. - Activate
Enable tracing (t)to easily follow background layers such as buildings and treecrowns. - Click on the
Add Polygon Featureicon to add a new typology polygon. Finish by right-clicking or double-clicking. A pop-up window opens to start editing the attributes.
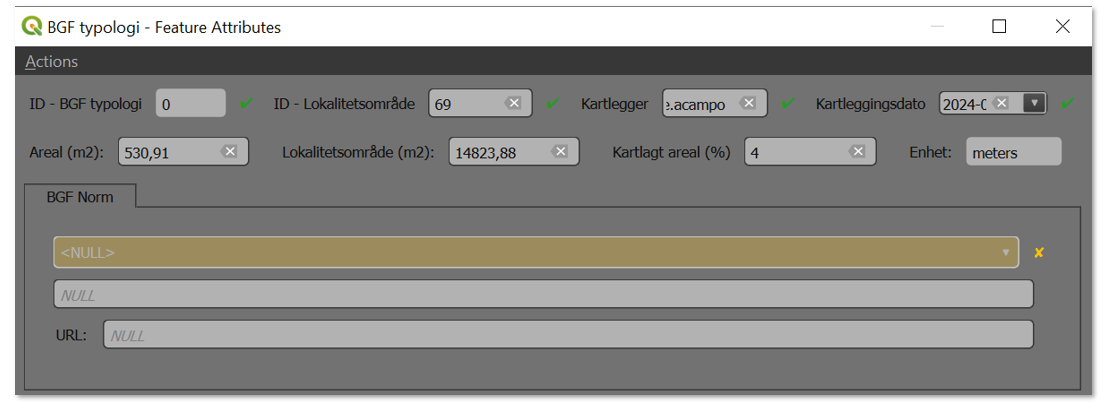
Filling in the attributes
- Review the
adminattributes and check that they are filled out correctly.- Check that the
ID - Lokalitetsområdecorresponds with the study area ID. - Check the
Kartlegger(registrant) andKartleggingsdato(date).
- Check that the

- Select the BGF Norm you like to use for mapping:
PBE 2023orSN 2020- the url to the selected norm will apear for additional info.
- additional tabs become visible to start classifing the typology.
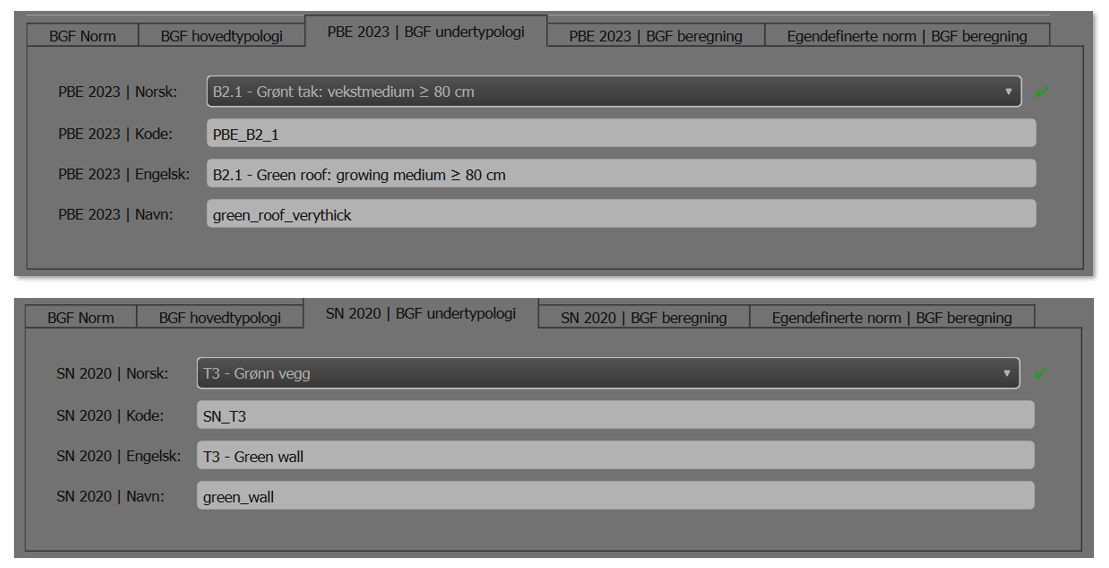
- Classify the BGF typology
- select the main typology in the tab
BGF hovedtypologi - depending on which Norm you have selected, you can select the sub typology in either the
PBE 2023 | undertypologiorSN 2020 | undertypologitab.
- select the main typology in the tab
-
Check the calculated BGF value for the polygon.
The BGF value for the selected norm is visible under the tab
PBE 2023 | BGF beregningorSN 2023 | BGF beregning.
Note that these values are not (yet) divided by the total study area. It is also important to note that all classes are calculated by multiplying the typology area by the weight, except for trees. Here the count of trees is multiplied by the weight. It is important to map trees individually as the tool assumes that each row in the attribute table stands for óne tree. Thus the BGF value for a tree polygon equals the weight (1*BGF weight). The total BGF score is calculated in a separate table see Calculate the total BGF score.
-
(OPTIONAL) use a user-defined norm.
After filling in the BGF typology, you see that also a tab appears for
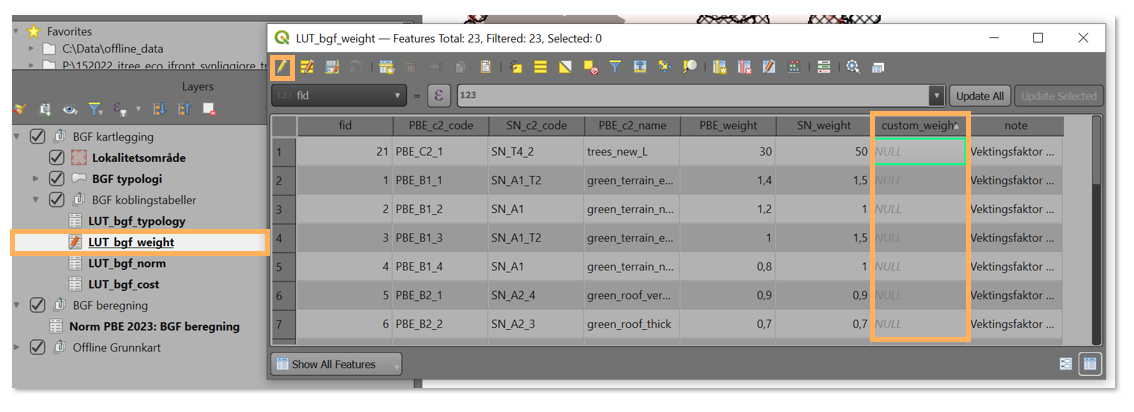
Egendefinerte Norm | BGF beregning. The user-defined norm is not filled out as default and thus the BGF weight and value will be set toNULL.Define your own Norm:
- Open the lookup table
lut_bgf_weightunder the tabBGF koblingstabller:Right click -> Open attribute table - Activate editing mode by clicking on the
Pencilicon. - Fill out values for each typlogy under the column
custom_weight. - Start mapping your BGF typologies, the user-defined norm will now be automatically calculated using the values you entered in the table.
- Open the lookup table
-
Check the blue-green infrastructure costs under the group
Kostnader.The costs are calculated automatically, by using a lookup_table. Note that costs are calculated by multiplying the area (m2) by the cost value in the look up table. Thus, trees are also economically valued by tree crown coverage and not per individual tree.
Add a comment, or leave the default value:
Ingen kommentar.
Repeat these steps untill the complete study area is mapped and the Kartlagt areal (%) attribute shows 100 %.
Note: that the complete study area must be mapped and all attributes must be filled out correctly, otherwise the BGF score cannot be calculated. If a polygon is not mapped correctly, or the attributes are not filled out correctly it will be classified as Ikke klassifisert.
Calculate the total BGF score
The final BGF score for each study area is calculated in a separate table under the tab BGF beregning. These table aggregates the results of the BGF-mapping and calculates the BGF score. Note that the total score is calculated differently for different norms. It is important to choose the correct norm and follow the steps outlined below.
Norm PBE 2023
- Navigate to:
BGF beregning -> Norm PBE 2023 | BGF beregning - Open the attribute table:
right-click. - Switch to
form viewin the bottom right corner. - Check that the info under
Admin,ArealandBGF normis filled in correctly. - Answer the TRUE-FALSE questions under
Styrke blågrønn struktur og biologisk mangfold. - Check the automatically calculated BGF-values per typology type under
Terreng og Flater - Check the automatically calculated BGF-values for trees under
Trær - Check the total BGF-score
- Export results:
right-click -> Export -> Save features as -> CSV/EXCEL
SN Norm not yet included, wait for license
Calculate the total cost for Blue-Green Infrastructure
work in progress, needs feedback from bart/max
Export Data
To export your data right-click on the layer you like to export and choose Export -> Save features as. In the upper drop-down box you can choose your export format.
Here are examples for the most common exports:
- Export blue-green structure typologies to .GPKG: go to layer
BGF typologiesandExportas GPKG (to include geometry) or to csv/excel to only export the attributes. - Export the final BGF score:
BGF beregning -> Norm PBE .. or Norm SN ..to csv - Export the final blue-green structure costs:
BGF beregning -> BGF Cost beregning.
Future improvements:
- option to export a PDF rapport
Common errors
- Topology errors, solve using the
Topology Checkerpluginn read more in the QGIS User Guide - Attributes are not calculated, sometimes you must make a change before the calculations of attributes take place. Solve by for example changing the typology to another value and then change back.
- Attribute values you fill in are overwritten by the default value. For example, the field
Kommentardoes not want to change. Go to the layer where the problem occurs, right-click onPropertiesnavigate toAttribute formsand uncheckApply default value by update. ’
Test change
NINA Contacts
BGF:
- David Barton
- Bart Immerzeel
- Maria Korkou
BGF-QGIS application:
- Willeke A’Campo
- Bart Immerzeel